When selecting a shower drain, there are many options available. Your decision will be influenced by the type of pipes in your home, the shower base, and the drain manufacturer’s recommendations. Remember that 2-inch drainpipes, not the 1 1/2-inch pipe typically seen on bathtubs, are the standard size for shower drain assemblies.
How to Install a Shower Drain in the Compression Style
Compression washers and nuts are used to secure compression-type shower drain to the house’s drain pipes. Particularly if you don’t have access to the region below the shower base through a basement or crawlspace, this drain is typically simpler to install than solvent-glued drains. Brass, ABS, or PVC compression-style drain assemblies are also available, though PVC is steadily gaining in popularity. Shower bases made of steel, fibreglass, or acrylic can be used with any of these materials.

1.Drainpipe trimming
According to the manufacturer’s instructions, the drainpipe for a compression-style shower drain fitting should extend up to roughly 3/4 to 1 inch below the lip of the shower drain. It might be necessary to test-fit the shower base to determine the correct height before removing it to cut the pipe.
You can use a hacksaw or plastic tubing cutter to cut the drain pipe. Make sure to make the cut flat and level when using a hacksaw.

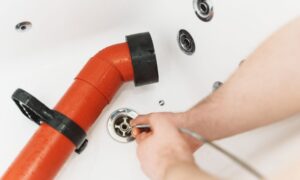
2.Attach the drain assembly to the pipe
Over the drain assembly tailpiece that is under the shower base, place the cardboard friction washer and rubber sealing washer. Using channel-lock pliers, tighten the mounting nut onto the tailpiece. The shower drain assembly should then be inserted into the opening after applying a bead of silicone caulk around the top flange.
Remove any extra caulk that has leaked out near the drain assembly by wiping it down.

3.Set the Shower Base in Place
Place the shower base with care, so the drainpipe rises into the drain assembly.

4.Insert the compression gasket
For the soft rubber compression gasket to fit around the drainpipe, place it into the drain aperture from the bottom. The compression nut should be threaded into the drain aperture and tightened. The fitting tool with compression-style drains makes it easier to use a screwdriver to tighten the nut from inside the drain. The rubber gasket is squeezed against the drainpipe as you tighten it, forming a watertight seal.
Snap the grate over the drain opening after removing the fitting tool. Before the shower, give the silicone 24 hours to cure.